
EQS in UE4 comes with a good set of generators of query items but there might be cases where you prefer to create generators tailored on your needs.
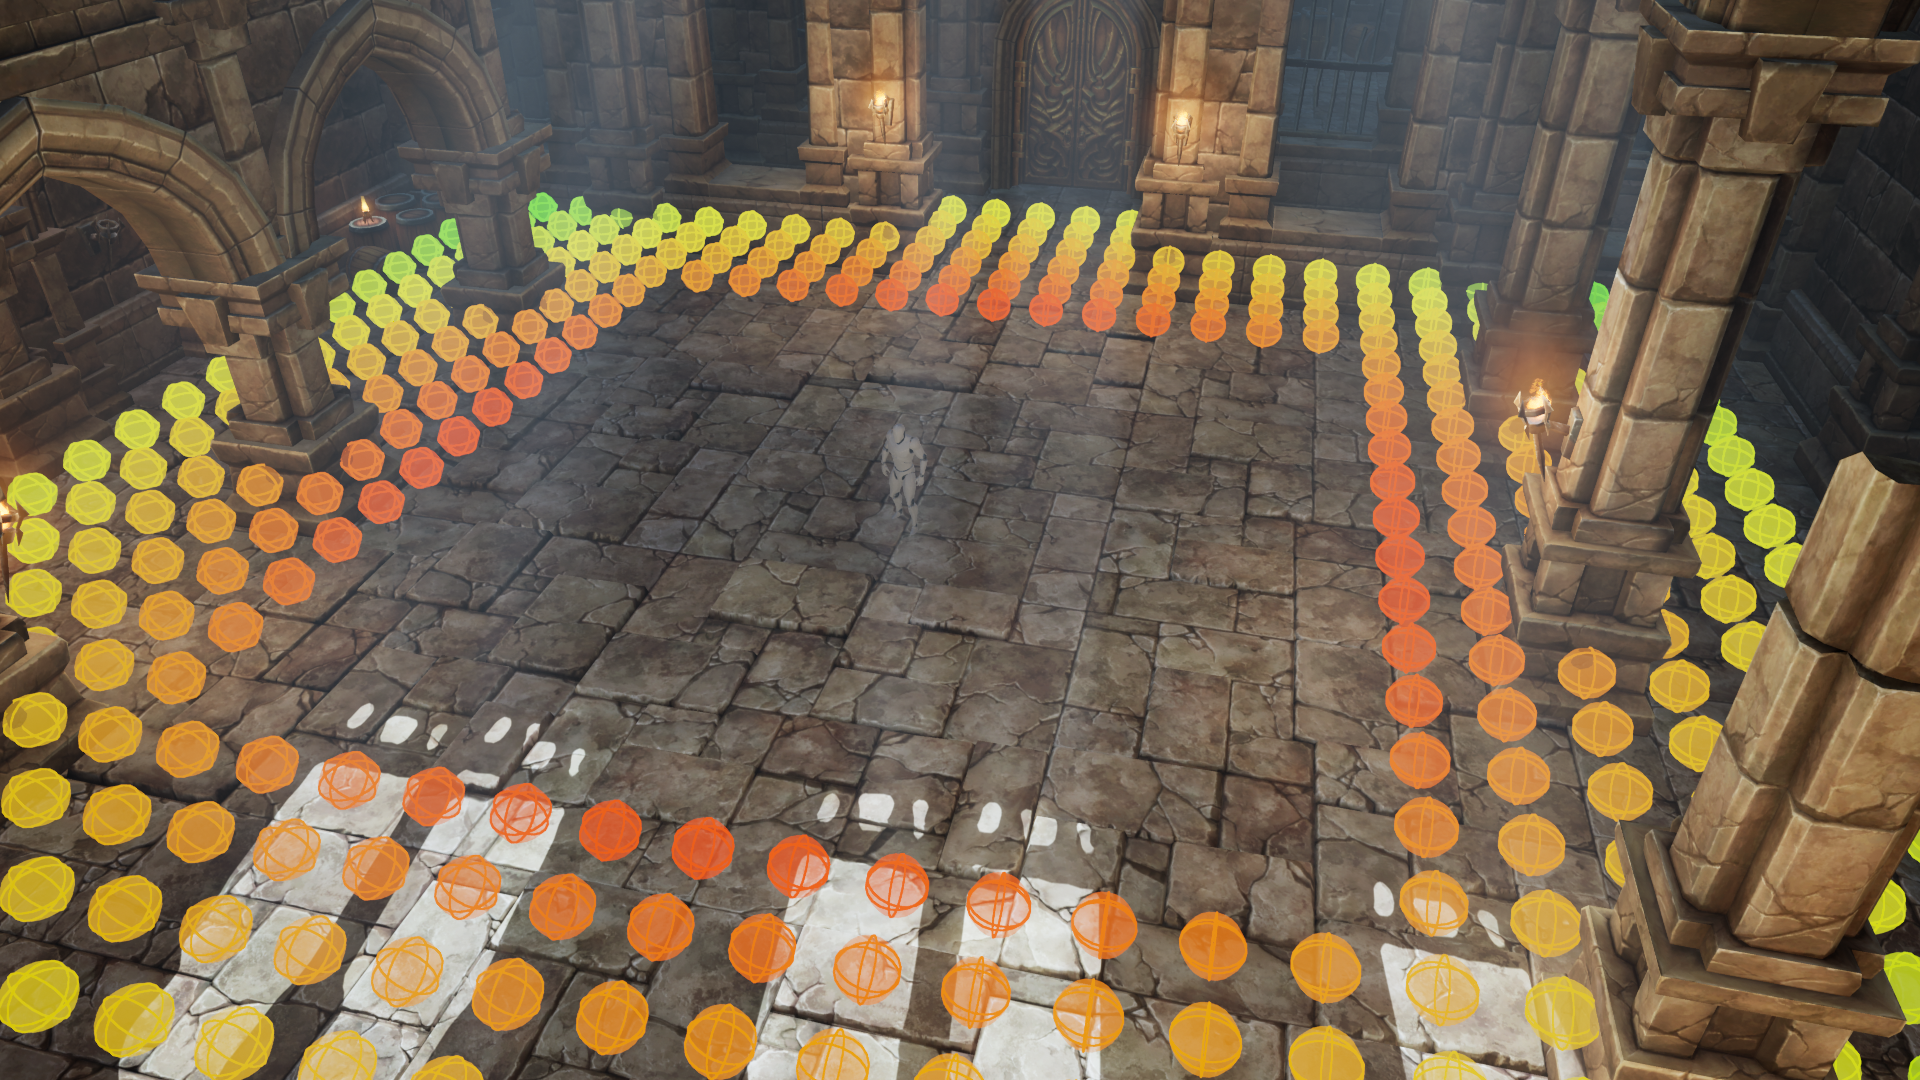
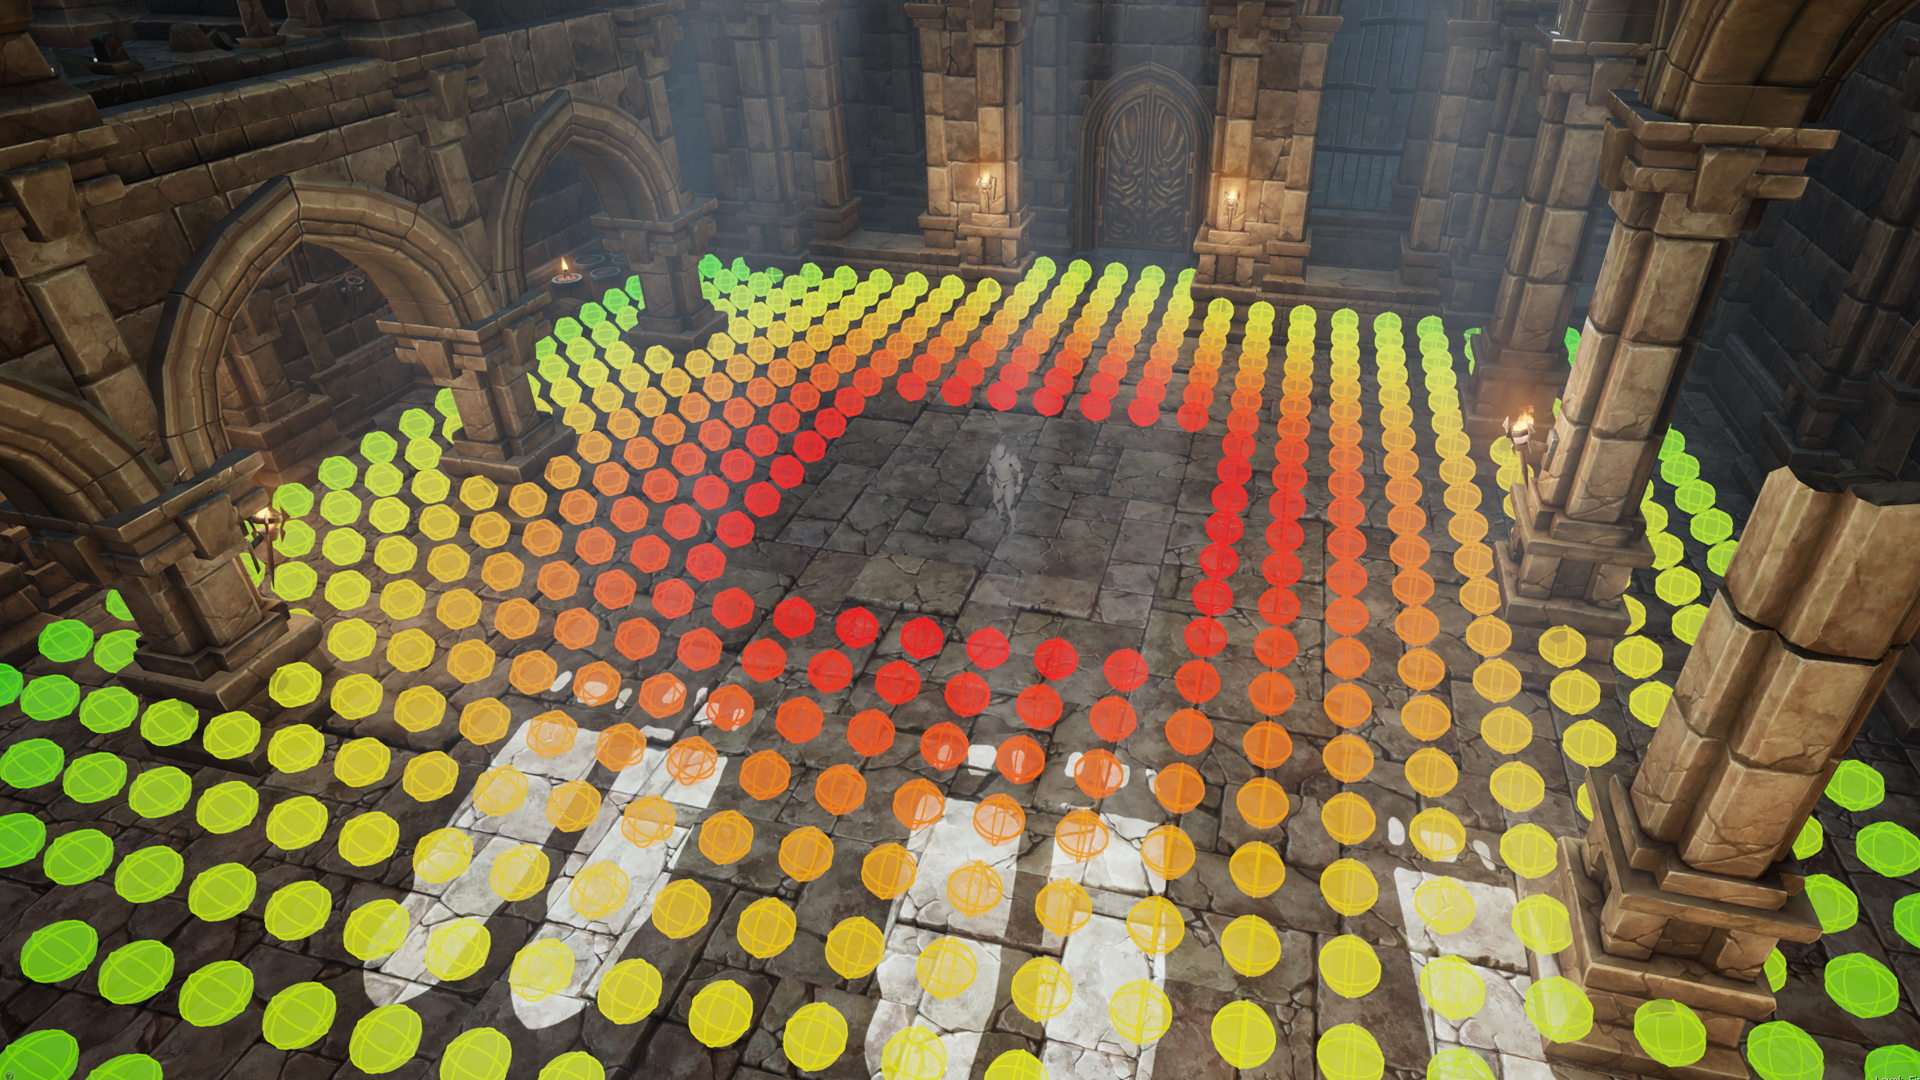
I decided to write my own generator because I had to write a query to find the best position around the querier but not too close to it. I knew that I could just add a distance tests to increment score with distance but I didn’t even want to consider items within a certain range from the querier so I ended up with a custom generator that produces a hole around the querier location. Here is a comparison between the Simple Grid Genrator available in the UE4 EQS system and my generator.
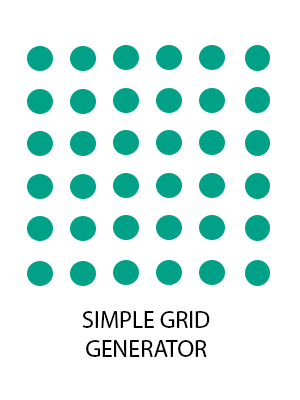

As you can see the Simple Grid Generator produces a square. While our Simple Grid Offset Generator produces a square with a hole.
LET’S CODE
Instead of subclassing the Simple Grid Generator I decided to start from a basic subclass of UEnvQueryGenerator_ProjectedPoints(the base type for all the other shapes generators). I found extremely useful to use Unreal Engine code as starting point for my implementation and I’ve mainly implemented my generator following the original code of the Simple Grid Generator, adding the logic to create the hole in the grid.
Let’s go through each needed step to create this class.
GENERATOR PARAMETERS
Here are the parameters needed to define the generator:
OffsetSpace: is the space that defines the size of the hole.
GridHalfSize: is the size of the grid.
SpaceBetween: is the space that defines the distance between each item.
The data type for these values is FAIDataProviderFloatValue. This is a special data type that inherits from FAIDataProviderValue. This data type wraps a value (int, float or bool) around a struct adding logic for data binding.
In a few world you will be able to edit this parameter from another resource and update generator items at run time. More info on this topic at this link.
and a blueprint example here.
In case you are not interested in this option you can use a simple float.
Here is the code of the header that defines these parameters.
class AMyController : public AAIController{
UPROPERTY(EditDefaultsOnly, Category = “Grid Parameters”)
FAIDataProviderFloatValue OffsetSpace;

UPROPERTY(EditDefaultsOnly, Category = “Grid Parameters”)
FAIDataProviderFloatValue GridHalfSize;

UPROPERTY(EditDefaultsOnly, Category = “Grid Parameters”)
FAIDataProviderFloatValue SpaceBetween;
}
Directly from the UE4 documentation:
“…a Generator such as the Simple Grid Generator can use a Context that returns multiple locations or Actors. This will create a Simple Grid, of the defined size and density, at the location of each Context.”
Obviously we don’t want to lose the ability to define custom context that are not just the querier. So let’s add a new parameter of type subclassof UEnvQueryContext. It will come in handy soon when we will generate the items.
UPROPERTY(EditDefaultsOnly, Category = Generator)
TSubclassOf GenerateAround;
GENERATING ITEMS
The main function responsible to create the items for our generator is GenerateItems, and it is defined in the UEnvQueryGenerator class.
We will override it adding our custom code.
The first thing to do here is to bind generator parameters to the query instance to be able to use data binding on this generator:
UObject* BindOwner = QueryInstance.Owner.Get();
GridHalfSize.BindData(BindOwner, QueryInstance.QueryID);
SpaceBetween.BindData(BindOwner, QueryInstance.QueryID);
OffsetSpace.BindData(BindOwner, QueryInstance.QueryID);
then we can grab the current value for this parameter (be sure to use the GetValue function instead of trying to access the value directly):
float RadiusValue = GridHalfSize.GetValue();
float DensityValue = SpaceBetween.GetValue();
float OffsetValue = OffsetSpace.GetValue();
With the next part of code we will finally create the query items, following this 3 points :
1 – calculate the total items number (taking into account the possibility of multiple contexts)
2 – calculate each item position
3 – Project all points and remove those outside the current navmesh and store the result.
The code is quite trivial, here you can find these three steps explained with comments:
// Get number of items per row and calculate the indexes ranges for the hole
const int32 ItemsCount = FPlatformMath::TruncToInt((RadiusValue * 2.0 / DensityValue) + 1);
const int32 ItemsCountHalf = ItemsCount / 2;
const int32 LeftRangeIndex = ItemsCountHalf - FPlatformMath::TruncToInt(OffsetValue / DensityValue) - 1;
const int32 RightRangeIndex = ItemsCountHalf + FPlatformMath::TruncToInt(OffsetValue / DensityValue) + 1;
const int32 OffsetItemsCount = FPlatformMath::TruncToInt((ItemsCount * 2.0 / DensityValue) + 1);

// Get locations for each context (we might have more that one context)
TArray<FVector> ContextLocations;
QueryInstance.PrepareContext(GenerateAround, ContextLocations);

// Reserve the needed memory space of items for each context.
// the total items count is calculated subtracting the items located into the hole from the total list of items.
TArray<FNavLocation> GridPoints;
GridPoints.Reserve(((ItemsCount * ItemsCount) - (OffsetItemsCount * OffsetItemsCount)) * ContextLocations.Num());
// Calculate position of each item
for (int32 ContextIndex = 0; ContextIndex < ContextLocations.Num(); ContextIndex++) {
	for (int32 IndexX = 0; IndexX < ItemsCount; ++IndexX)
	{
		for (int32 IndexY = 0; IndexY < ItemsCount; ++IndexY)
		{
			// it the item is inside the hole ranges, just skip it.
			if ((IndexY > LeftRangeIndex && IndexY < RightRangeIndex) && (IndexX > LeftRangeIndex && IndexX < RightRangeIndex)) {
				continue;
			}
			// starting from the context location, define the location of the current item
			// and add it to the gridPoints array.
			else {
				const FNavLocation TestPoint = FNavLocation(ContextLocations[ContextIndex] - FVector(DensityValue * (IndexX - ItemsCountHalf), DensityValue * (IndexY - ItemsCountHalf), 0));
				GridPoints.Add(TestPoint);
			}
		}
	}
}
// Project all the points, remove those outside the current navmesh and store the result.
ProjectAndFilterNavPoints(GridPoints, QueryInstance);
StoreNavPoints(GridPoints, QueryInstance);
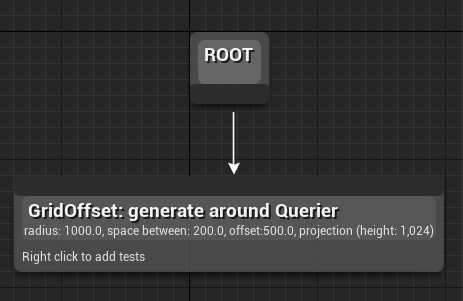
GENERATOR TEXTUAL DESCRIPTION
The final touch is given by the functions GetDescriptionTitle and GetDescriptionDetails. They will just add a textual description directly visible in the EQS editor. The description and title will change depending on the value selected by the developer in the editor.
I’m taking the functions as is from simple grid generator adding the offset information.
FText UEnvQueryGenerator_GridOffset::GetDescriptionTitle() const
{
	return FText::Format(LOCTEXT("GridOffsetDescriptionGenerateAroundContext", "{0}: generate around {1}"),
		Super::GetDescriptionTitle(), UEnvQueryTypes::DescribeContext(GenerateAround));
};

FText UEnvQueryGenerator_GridOffset::GetDescriptionDetails() const
{
	FText Desc = FText::Format(LOCTEXT("GridOffseDescription", "radius: {0}, space between: {1}, offset:{2}"),
		FText::FromString(GridHalfSize.ToString()), FText::FromString(SpaceBetween.ToString()), FText::FromString(OffsetSpace.ToString()));

	FText ProjDesc = ProjectionData.ToText(FEnvTraceData::Brief);
	if (!ProjDesc.IsEmpty())
	{
		FFormatNamedArguments ProjArgs;
		ProjArgs.Add(TEXT("Description"), Desc);
		ProjArgs.Add(TEXT("ProjectionDescription"), ProjDesc);
		Desc = FText::Format(LOCTEXT("GridOffsetDescriptionWithProjection", "{Description}, {ProjectionDescription}"), ProjArgs);
	}

	return Desc;
}
USING THE GENERATOR
If you open the EQS editor you will see that our new generator is available in the generators list and you can use it exactly as the other official generators.
You can find the full code for this tutorial on GitHub.
Feel free to poke me on Twitter or write a comment here.
Ciao!

Yari D'areglia
https://www.thinkandbuild.itCEO at Nexent.io by day, indie game developer by night. I also run the blog indiegames.wtf.