In this tutorial I’m going to implement the “Pull To Refresh” control created for the iPhone app Periscope. It’s something new that caught my attention, so I thought I’d “disassemble” their layout trying to create something similar.
Even if I’m not sure if they are using a standard NavigationBar, I’d like to implement this behaviour only using the default iOS controls. For this reason, we are going to work on the `titleView` properties adding all the main logics there.
Here is a preview of the final result!
Let’s Code
You can download the project and follow the next steps. I’m going to illustrate how the control has been implemented, line by line – as usual.
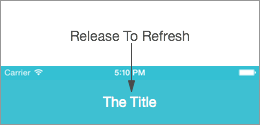
Before diving into the code let’s identify the main actors for this control.
2. The Release to Refresh Label

3. The Animated Background presented when you release the scrollview.

The logic is really simple: We have to translate the Scrollview content offset into a new position for the Title and ReleaseToRefresh Labels and when the user releases the Scrollview we show and animate the striped background.
Customizing the NavigationBar Title
Open the `CustomNavigationBar.swift` file. Here you’ll find the implementation for our custom UINavigationBar.
Check the `updateTitleView` function.
We are going to use the `titleView` property of the UINavigationBar class to setup a completely custom title.
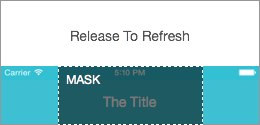
In that view we attach the two labels using two UIView as Container and Mask.
The mask view is used to clip the labels when they move outside the NavigationBar. The container view, placed directly inside the titleView, ensures that the Labels can be shown below the status bar. The titleView frame starts just after the status bar frame but by using this trick, since both the titleView and the containerView are not clipped, we can display elements outside the titleView boundaries.
The labels are then placed at a fixed vertical distance inside the MaskView.
As you can see the “ReleaseLabel” is placed outside the NavigationBar frame area. We’ll get back to the striped background later.
Animating the Labels
If you open the file CustomNavigationController.swift you can check the UINavigationController Extension.
// MARK: CustomNavigationBar Extension

extension UINavigationController{

    // Return the customNavigationBar object, if it exists.
    func customNavigationBar()->CustomNavigationBar?{
        if let navbar = self.navigationBar as? CustomNavigationBar{
            return navbar
        }
        else{
            return nil
        }
    }

    // Set the CustomNavigationBar as delegate for a UIScrollView
    func setupPulltoRefresh(scrollView:UIScrollView){
        if let navbar = self.customNavigationBar(){
            scrollView.delegate = navbar
        }
    }

}
Essentially it adds two methods to the UINavigationController class: the first, CustomNavigationBar() is just a helper that returns a CustomNavigationBar instance if available; the second, setupPullToRefresh, sets the current CustomNavigationBar as delegate for a Scrollview.
Open the file TableViewController to see how the last function gets called to link the CustomNavigationBar to the Table’s Scrollview.
    override func viewDidLoad() {
        super.viewDidLoad()
        self.navigationController?.setupPulltoRefresh(self.tableView)
    }
At this point the CustomNavigationBar (that is a scrollview delegate now), thanks to the scrollViewDidScroll method can intercept the Scrollview offset and perform the needed transformations on the labels.
    func scrollViewDidScroll(scrollView: UIScrollView){

        var scrollviewOffset = -(scrollView.contentOffset.y + 64)
        if scrollviewOffset >=  0 {
            var translationOffset = min(scrollviewOffset, stepOffset)
            var alpha =  min (scrollviewOffset / stepOffset, 1.0)

            self.refreshLabel?.layer.transform = CATransform3DMakeTranslation(0, translationOffset , 0)
            self.titleLabel?.layer.transform = CATransform3DMakeTranslation(0, translationOffset , 0)
            self.refreshLabel?.alpha = alpha
        }else{
            self.titleLabel?.layer.transform = CATransform3DIdentity
            self.refreshLabel?.layer.transform = CATransform3DIdentity
            self.refreshLabel?.alpha = 0.0
        }
    }
The code is extremely simple: we use the transform property to apply a Y transformation on the labels and we update the alpha of the ReleaseLabel using a normalized scrollviewOffset.
The Animated Background
At the end of the function updateTitleView you can find this code
        // Setup the Loading-image view ————

        var rect = bounds
        rect.size.width = rect.size.width * 2
        loadingBg = UIView(frame: rect)
        loadingBg?.alpha = 0.0
        loadingBg?.backgroundColor = UIColor(patternImage: UIImage(named: “Loading”)!)
        loadingBg?.center.x = bounds.size.width
        insertSubview(loadingBg!, atIndex: 1)
This code puts a view with a striped background inside the NavigationBar. This background view has a width that is wider than the screen size: we need this structure to perform a continuous animation (more on this later).
The animation starts when users release the Scrollview, so we use a Scrollview delegate function scrollViewDidEndDragging again to call another function responsible for the animation startLoaderAnimation:
    func scrollViewDidEndDragging(scrollView: UIScrollView, willDecelerate decelerate: Bool){
        var scrollviewOffset = -(scrollView.contentOffset.y + 64)

        if scrollviewOffset >= stepOffset{
            self.startLoaderAnimation()
        }
    }
The startLoaderAnimation function applies a repeated animation on the striped background:
    func startLoaderAnimation(){
        loadingBg?.layer.removeAllAnimations()

        UIView.animateWithDuration(0.5, animations: { () -> Void in
            self.loadingBg?.alpha = 1.0
        })

        var animation = CABasicAnimation(keyPath: “position.x”)
        animation.duration = 3
        animation.fromValue = loadingBg!.layer.position.x
        animation.toValue = loadingBg!.layer.position.x - 100
        animation.repeatCount = HUGE
        loadingBg?.layer.addAnimation(animation, forKey: “pos”)
    }
It’s interesting to note that the background is drawn using a single image that is 100pt wide and gets repeated N times to achieve the striped effect. To create an infinite and continuous animation we can move the view to the left by a space that is a multiple of the image width. Each time the animation completes, the view is placed at its initial position and then the animation restarts without any glitches. The final effect will be a continuous, infinite animation.
Final considerations
This code obviously needs to be improved for it to be used in a real application (we’ve used hardcoded frames!), but I think it’s a really good starting point to implement a complete and professional custom control!
If you have suggestions to improve the code just poke me on Twitter.
Ciao!
Yari D'areglia
https://www.thinkandbuild.itSenior iOS developer @ Neato Robotics by day, game developer and wannabe artist @ Black Robot Games by night.

