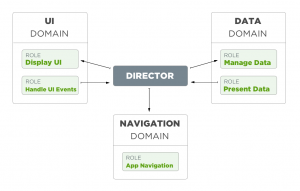
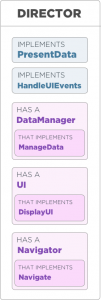
In the previous article we introduced VIPER-S, with an overview of its Domains and Roles, we organized our modules with folders and we started writing the contract for the “ItemsList” module. With this new article we’ll complete the architecture by implementing the Actors. An Actor is the entity responsible for the implementation of all the Roles for a specific Domain that, as you may remember from the previous article, are defined by the protocols in the Contract file. That being said, we are going to implement each Actor using those protocols and connecting Actors to each other in order to achieve the architecture’s flow. Here’s the flow overview again for a quick review.
ACTORS: THE WORKER
With the previous article we have introduced the term “Worker”. This name is a good choice because it defines the class that is responsible for handling the Data domain and its roles.
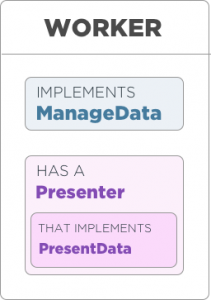
First we define the file and class names. As per our convention, we use the folder structure for the prefix (Items->List) and we complete the name with the word “Worker”, which results in “ItemsListWorker”. The protocol that we are going to implement for this actor is “ItemsList_ManageData”.
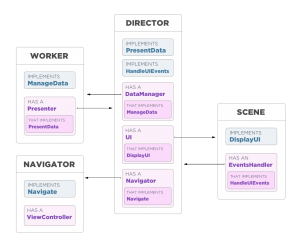
At some point the worker will have to communicate with another object which is able to present information. In our architecture this object implements the “ItemsList_PresentData” protocol. Here is an image to better describe the Worker structure.
With this structure in mind let’s write the code for the Worker:
class ItemsListWorker {
    let presenter: ItemsList_PresentData!
}

extension ItemsListWorker: ItemsList_ManageData {

    func fetchItems(){

       // get items

       ... code to obtain the items here ....

       if operationCompleted  {
           presenter.present(items: Items)
       } else {
       // or in case of errors
           presenter.presentError()
       }
    }

    func deleteAllItems(){

       // delete items

       ... code to delete the items here ....

       if operationCompleted  {
           presenter.presentSuccess()
        } else {
           presenter.presentError()
        }
    }
}
I generally prefer to split logics using extensions, so I’ll keep this rule for the rest of the architecture. If the code for a file gets longer than 200 lines, I usually create a new file with a specific name using extensions. Feel free to keep all the code in the same block if you prefer.
The code for this class is straightforward. Essentially we interact with get/set data and, depending on the result of this operation, another class is called to present the result.
Now let’s focus on the “presenter.present(items: items)” call. If you check the prototype for the “ItemsList_PresentData” protocol you’ll notice the Item type. It’s a structure that we use as model for the information retrieved from databases/network/whatever. It’s really useful to define a model to communicate between domains because we are improving our contract with more information that better defines the communication between actors.
Let’s extend the contract file with the Item structure definition: an item has a name, a creation date, and can be enabled or disabled.
struct Item{
     let name: String
     var enabled:Bool
     let date: Date
}
ACTORS: THE SCENE
This actor is essentially the user interface and it covers the UI domain. The name for this class, following our naming convention, is “ItemsListScene”.
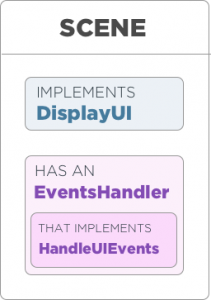
As we have already seen for the UI domain, the Scene actor has two main roles: drawing/updating the UI elements and redirecting UI events to an event handler. In order to cover these roles it has to implement the DisplayingUI protocol and it needs to communicate with another object that implements the UIEventsHandler protocol.
Since at some point we have to communicate with the iOS navigation flow, we need to be in contact with the underneath UIKit layer and with the default system UI events. This actor is therefore a subclass of UIViewController in order to create this communication channel. If you are used to working with MVC, you’ll probably find the limited responsibility set that we are assigning to the view controller to be really unusual.
Let’s see how all this logic ends up working in our code:
class ItemsListScene: UIViewController {
    @IBOutlet var table: UITableView!
    var items: [ItemUI] = []
    var eventsHandler: ItemsList_UIEventsHandler!
}

// MARK: - Display UI
extension ItemsListScene: ItemsList_DisplayUI{

    func display(items: [ItemUI]) {
         self.items = items
         table.reloadData()
    }

    func display (error:String){
         showPopup(title: “Error”, message: error)
    }

    func displaySuccess(){
         showPopup(title: “Success”, message:”Operation completed”)
    }
}

// MARK: - UI Interaction
extension ItemsListScene {

    @IBAction func deleteAll(){
         eventsHandler. onDeleteAll()
    }
}
The code is straightforward, so we only need to check what the ItemUI is. As you know by now, with VIPER-S we want to define a clear distribution of responsibilities. That’s why we don’t want to overload the Scene with useless information. Its main role is to display information, so it expects a model that it can display without any further action. The “ItemUI” model is a transformation of the Item model that we’ve seen with the Worker actor. Let’s add the definition of the “ItemUI” model to the contract as we did for the Item model and then compare the two.
struct ItemUI {
    let name: String
    let color: UIColor
    let date: String
}

struct Item {
     let name: String
     var enabled: Bool
     let date: Date
}
As you can see the two structures are slightly different. Specifically, the “name” is the only unchanged data. For starters, the “enabled” property is no longer available. Also, we are only going to assign a color to item state, because we need to talk in “UI language” here. The UI doesn’t know what “enabled” means for an item: it just needs to know which is the color to use when drawing. The “date” has been converted from Date to String because it is the most appropriate type for a label. More on this conversion with the Director actor later.
The last part of the Scene is the code needed for the Table datasource and delegate. If you prefer, you can add this code to a brand new file where you only put the code related to the table. A good name for that would be “ItemsListSceneTable.swift”.
extension ItemsListScene: UITableViewDelegate, UITableViewDataSource {

    func tableView(_ tableView: UITableView,
                   numberOfRowsInSection section: Int) -> Int {
        return items.count
    }

    func tableView(_ tableView: UITableView,
                   cellForRowAt indexPath: IndexPath) -> UITableViewCell {

        let cell = tableView.dequeueReusableCell(withIdentifier: "Item")
        let item = items[indexPath.row]

        let nameLabel = cell!.viewWithTag(1) as! UILabel
        let dateLabel = cell!.viewWithTag(2) as! UILabel

        nameLabel.text = item.name
        nameLabel.color = item.color
        dateLabel.text = item.date

        return cell!
    }

    func tableView(_ tableView: UITableView,
      didSelectRowAt indexPath: IndexPath) {

        eventsHandler.onItemSelected(index: indexPath.row)
    }

}
Nothing special happens on the item drawing side: they are presented as cells, setting UI elements directly with the information of the “ItemUI” model.
When a cell is selected the “eventsHandler” is triggered with the “onItemSelected” event.
ACTORS: NAVIGATOR
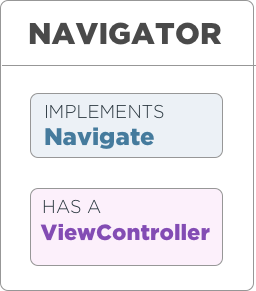
Here we implement the roles of the Navigation domain. The Navigator actor needs to implement the Navigate protocol and it needs a reference to the module’s ViewController to easily obtain access to the standard UIKit navigation functions.
Let’s check the Navigation class code one step at the time.
class ItemsAddNavigator: Navigator {
    static func makeModule()-> ItemListUI {

        // Crete the actors
        let scene = instantiateController(id: "List",
                                          storyboard: "Items”) as! ItemsListScene
        let navigator = ItemsListNavigator(with: scene)
        let worker = ItemsListWorker()
        let director = ItemsListDirector()

        // Associate actors
        director.dataManager = worker
        director.navigator = navigator
        director.ui = scene
        worker.presenter = director
        scene.eventsHandler = director

        return scene
    }
}
This class is extending a generic Navigator class that is just a layer above some UIKit functions and that keeps a reference to the View Controller module. I’ve only pasted the interesting portion of the parent class here, but you can check the rest of the code in the example project on github.
import UIKit

class Navigator  {

    weak var viewController:UIViewController!

    init(with viewController:UIViewController) {
        self.viewController = viewController
    }

    static func instantiateController(id:String, storyboard:String, bundle:Bundle? = nil)-> UIViewController{

        let storyBoard = UIStoryboard(name: storyboard, bundle: bundle)
        let viewController = storyBoard.instantiateViewController(withIdentifier:id)

        return viewController
    }

    ... continue...
Let’s go back to the makeModule() function. Here we build the module that we are discussing: to me it’s fascinating how all the actors are easily associated to each other and how all the connections describe the whole architecture in a semantic way.
Let’s discuss the implementation of the Worker and the Scene for a moment. The Scene is initialized from a storyboard and the Director is its eventsHandler. The Worker on the other side needs a presenter that, again, is the Director (we’ll see later that the Director is responsible for the communication between domains, so it’s referenced by many objects).
Here is the portion of the Navigator class where we implement the Navigation:
extension ItemsListNavigator: ItemsList_Navigate{

    func gotoDetails(‘for’ item: Item){
        let itemDetail = ItemsDetailNavigator.makeModule(with: item)
        push(nextViewController: itemDetail)
    }

    func goBack(){
        dismiss(animated:true)
    }
}
With the gotoDetails function we call “makeModule”. In this case we are using the “makeModule” of the module that we will present, obtaining a View Controller that we push to the navigation stack.
The “makeModule” for the ItemsDetail module needs an Item and we can easily provide it directly with the gotoDetail function. What we see here is how information can be easily shared between modules using well defined models.
ACTORS: DIRECTOR
The director is the brain of VIPER-S. Its first role is to act as a bridge between all the domains. It knows how to present data for the Scene, how to interact with the Worker to get data after a UI event, and when it’s time to call the navigator to change view.
What I love of protocols is that we can easily achieve louse coupling: the director doesn’t need to know which classes it is going to call to complete all these tasks; it only needs references to objects that implement some of the protocols defined in the contract.
Let’s see the code and examine what’s needed for each domain, one at a time:
class ItemListDirector {

    var dataManager: ItemList_ManageData!
    var ui: ItemList_UIDisplay!
    var navigator: ItemList_Navigate!

    // Data
    var items: [Item] = []

    // UI
    var itemsUI: [ItemUI] {

        get {
            return itemsData.map { (item) -> ItemUI in
                return ItemUI(
                              name: item.name,
                              color: (item.enabled) ? UIColor.green : UIColor.red,
                              date: formatDate(item.date),
            }
        }
    }
}
At the top of the class we define the references to the other actors. Note that, as we mentioned earlier, the references are not pointers to Scene, Worker or Navigator objects, but just to objects that implement the needed protocols.
We keep a reference to the list of retrieved Items and we use a really handy dynamic property to convert from Item to ItemUI model.
The director is able to present data coming from a Worker, so it needs to implement the ItemsList_PresentData.
extension ItemsListDirector: ItemsList_PresentData{

    func present(items:[Item]){
        self.items = items
        ui.display(items: itemsUI)
    }

    func presentSuccess(){
        ui.displaySuccess()
    }

    func presentError(){
        ui.displayError()
    }
}
With the first function we have obtained some items, so we store them and, with the “itemsUI” property, we convert them to a model that can be easily presented with the UI (in this case the Scene). The other two methods are pass-through to present messages on the UI.
The HandleUIEvent implementation is straightforward:
extension ItemsListDirector: ItemsList_HandleUIEvents{

    func onUIReady() {
        dataManager.fetchItems()
    }

    func onDeleteAll(){
        dataManager.deleteAllItems()
    }

    func onItemSelected(index:Int) {
        let item = items[index]
        navigator.gotoDetail(for: item)
    }
}
When the onUIReady event is received, the Director asks the Data Manager for the items. The items will be presented with the method previously defined with the “PresentData” protocol. When an item has been selected, the Director will call the Navigator passing the selected item to show the item’s details view. After the deleteAll event is triggered, the director calls the dataManager to delete the items and then, depending on the result of the operation, the Director will present success or error with the methods we previously described.
Here is the overview of all the VIPER-S actors:
With the next and last article in the series, we are going to complete the VIPER-S code, learning how to share information between modules (we introduced the topic with the navigator class) and obviously talking about how to test this code.
Thanks again to Nicola for reviewing this article and for his very helpful hints!
Yari D'areglia
https://www.thinkandbuild.itCEO at Nexent.io by day, indie game developer by night. I also run the blog indiegames.wtf.
