
In this article I’ll go down the rabbit hole, showing how to setup and use the AI perception system. The official documentation about this topic is good but I had to scrape other needed information from various forum threads, Unreal-Answers posts and a lot of try-fail attempts. This article will condense my experience and findings into a single place 🙂
QUICK INTRO ABOUT PERCEPTION AI
If this is the first time you heard about Perception AI System you might be pleased to know that UE4 has a set of ready-to-use functionalities that let you easily extend your AI with senses like sight and hearing.
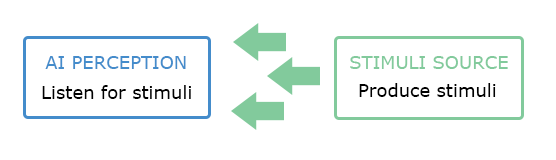
You essentially have to deal with 2 components:
AIPerception Component: It defines the receiver of the perception. You normally attach it to an AIController that has to register for one or more senses. This is the actor that should “see” or “hear” someone else.
AIPerceptionStimuliSource Component: This is a component that you can attach to a Character (actually I’ve seen it working also from Controllers, but I can’t find anyone pushing into this direction) to generate a trigger for the AIPerception component. This is the actor that will be “seen” or “heard” by someone else.
For the sake of simplicity (and to say the truth, because I haven’t used the other ones yet) I’m only talking about sight and hearing but there are other stimuli that you can listen and trigger with the AI Perception system like Damage, Team, Touch and Prediction, and you could even create your custom sense.
THE LISTENER SETUP
Let’s create a simple AI that will implement the sight perception and will be able to spot enemies.
We can create a new controller that inherits from AIController (later we will create a custom C++ AIController class just to include some features not available via Blueprints). Let’s call it SightAIController.
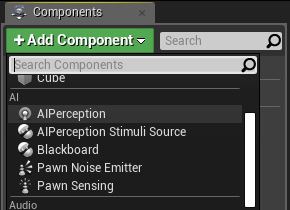
In the SightAIController just attach the AIPerception component.
Select the new added component and from the details panel, under AI Perception, add a new sense config selecting AI Sight config and use these parameters:
Sight radius:1500
Lose Sight Radius:2000
PeripheralVisionHalfAngleDegrees: 70
Now check the 3 checkboxes under detect by affiliation.
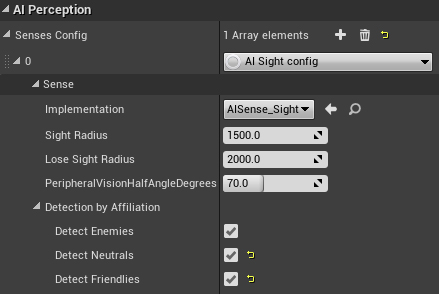
We have just created an AI that watches for a radius of 1500 units (15 mt) with an angle of 140 (70 left 70 right) degrees to spot enemies, neutrals or friend actors. The lose sight radius is still a mystery to me… I can’t understand exactly how to use it, but in general If the AI has seen an enemy, this is how far the enemy must move away before it loses the target.
At the time I’m writing this article (Unreal 4.22) the detected by affiliation option works only partially via Blueprints. As we’ll see later we need a way to define how to differentiate enemies, friends or neutral actors and to achieve this task we will use C++.
DEBUG LISTENER SETTINGS
To verify that your implementation is correct and that the parameters are working for your level we can leverage on AI debug tools. They are extremely useful and easy to use!
– Pick the mannequin character or create a new one and select the SightAIController as its AI Controller Class.
– Place it into the level and play the level.
– Press the “apostrophe” or “single quote” key on your keyboard and you will see a bunch of data on your screen.
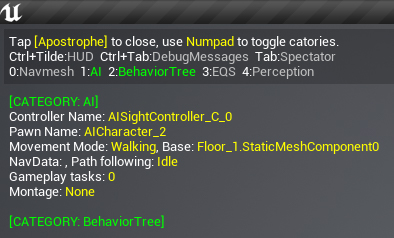
You can easily filter this data to include only stuff related to the AI Perception System. Pressing 0, 1, 2, 3, 4 on your numpad you can toggle information:
0 to toggle the NavMesh info, 1 is for AI, 2 is for BehaviourTree, 3 EQS and 4 is for Perception. Just disable what you don’t need and enable perception pressing 4.
You will see a green circle identifying the radius, and a violet one that identifies the lose sight radius. You should also see two green lines to highlight the 70 degrees sight angle (140 from left to right).
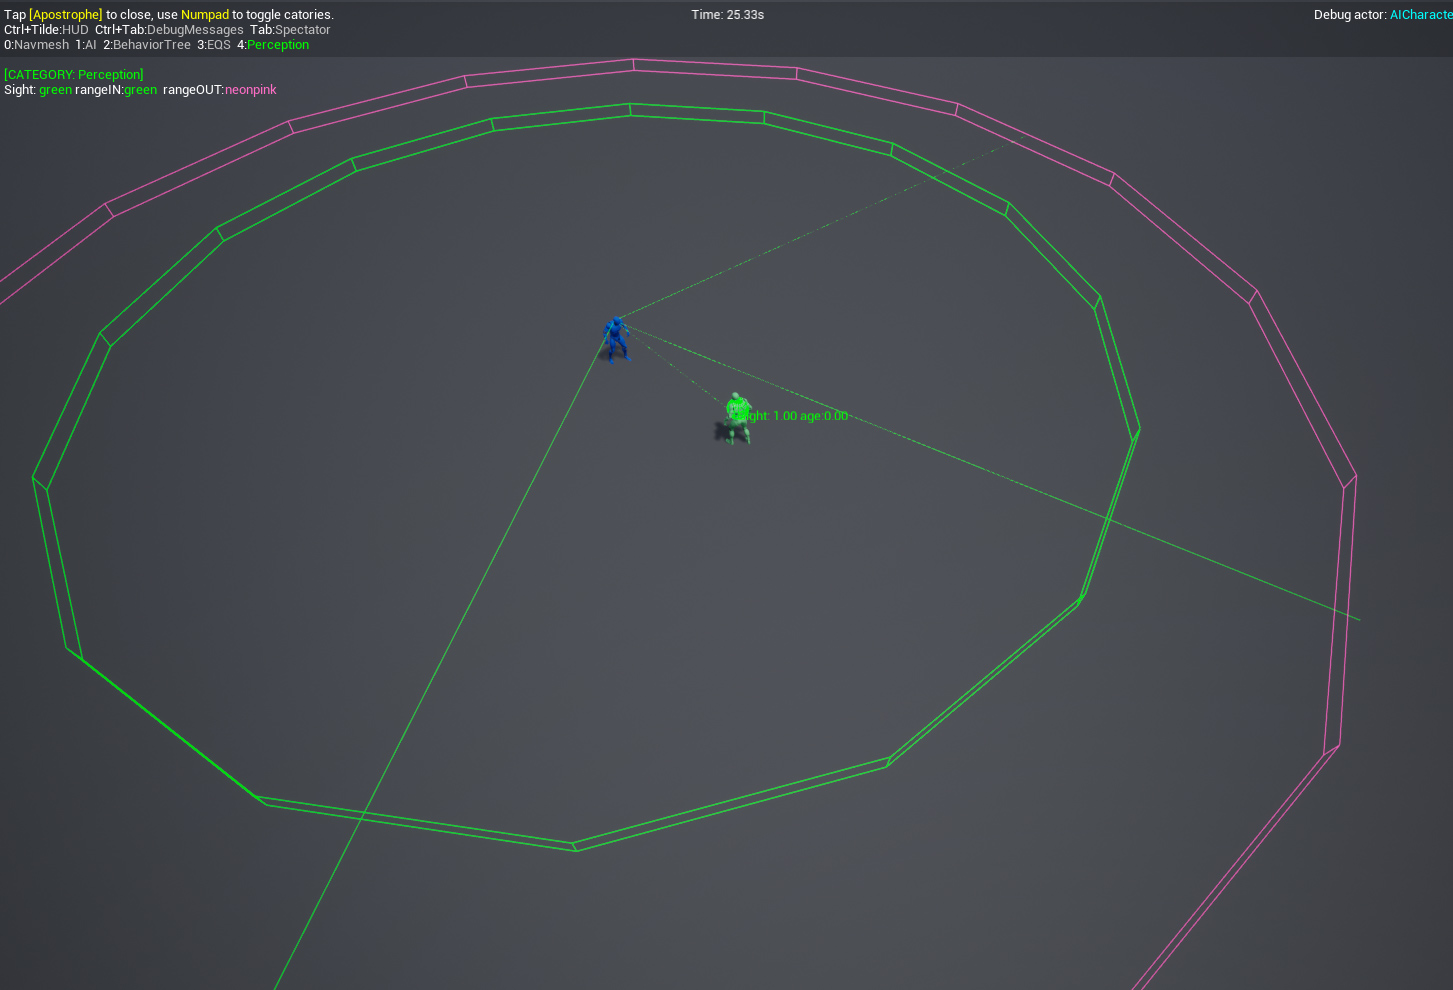
At this point if you play the game and you enable the debugger, running with your player in the AI perception area you should see a green sphere moving together with the player and stopping at the latest known position when you leave the sight radius area. It means that the AI has spotted you, yay!
By default Pawns are registered as stimuli sources, that is why it triggers AI sight even if we haven’t added any stimoli source to our character.
If you want to disable this behaviour just add these lines into your DefaultGame.ini configuration. The next section will show you how to enable the sense trigger only for the desired pawns through a dedicated stimuli source.
[/Script/AIModule.AISense_Sight]
bAutoRegisterAllPawnsAsSources=false
THE TRIGGER SETUP
Now let’s update the player Controller to trigger the AI sense that we have just implemented.
Attach the AIPerceptionStimuliSource component to the player character, then select the component and from the details panel, under AI Perception, add an element for Register as Source For Senses, set it to AISense_Sight and check Auto Register As Source for this character. This is enough to be sure that player will be spotted by another actor that uses AIPerception component with Sight.

FRIEND OR FOE?!
If you remember, I told you that the “detected by affiliation field” is not fully working from Blueprints. In general you haven’t got a way to setup the behaviour of one team toward another team from blueprints but we can easily handle this logic using C++.
The AAIController class implements an interface called IGenericTeamAgentInterface. This interface is responsible to provide information about team membership and the attitude of each team toward other teams. Here is where we need to write some missing pieces through C++, overriding the default behavior of this interface.
Let’s start by creating a custom AIController. Create a new C++ class that inherits from AIController and call it SightAIController.
Now what we want to do is to specify the controller team ID and its attitude toward other teams :
A team ID is defined by an uint8 wrapped into a struct called FGenericTeamId (by default value 255 is for “No Team’s”). While to define the attitude we can implement the IGenericTeamAgentInterface method called GetTeamAttitudeTowards returning the expected attitude, let’s see how.
In the controller header add a new public override:
#include "CoreMinimal.h"
#include "AIController.h"
#include "GenericTeamAgentInterface.h"
#include "SightAIController.generated.h"

UCLASS()
class TUTORIAL_API ASightAIController : public AAIController
{
  GENERATED_BODY()
  ASightAIController();

public:
  // Override this function
  ETeamAttitude::Type GetTeamAttitudeTowards(const AActor& Other) const override;
};
And implement this class specifying the team in the constructor and overriding the GetTeamAttitudeTowards function this way:
#include "SightAIController.h"

ASightAIController::ASightAIController()
{
  SetGenericTeamId(FGenericTeamId(5));
}


ETeamAttitude::Type ASightAIController::GetTeamAttitudeTowards(const AActor& Other) const
{

  if (const APawn* OtherPawn = Cast<APawn>(&Other)) {

    if (const IGenericTeamAgentInterface* TeamAgent = Cast<IGenericTeamAgentInterface>(OtherPawn->GetController()))
    {
      return Super::GetTeamAttitudeTowards(*OtherPawn->GetController());
    }
  }

  return ETeamAttitude::Neutral;
}
By default the GetTeamAttitudeTowards compares the TeamIDs of the sensed actor with the teamID specified in this controller, if they are different they will be considered hostile each other.
You could also implement your custom logic returning directly an ETeamAttitude value. A couple of examples: for an AI in berserk mode, that attacks any actors it sees around you will just always return “Hostile” or to create an alliance between two specific teams you could check teams IDs and return “Neutral” or “Friendly” depending on teams IDs.
You could easily access the team ID of each team agent with GetGenericTeamId():
if (const IGenericTeamAgentInterface* TeamAgent = Cast<IGenericTeamAgentInterface>(OtherPawn->GetController()))
    {
      //Create an alliance with Team with ID 10 and set all the other teams as Hostiles:
      FGenericTeamId OtherTeamID = TeamAgent->GetGenericTeamId();
      if (OtherTeamID == 10) {
        return ETeamAttitude::Neutral;
      }
      else {
        return ETeamAttitude::Hostile;
      }
    }
We are all set with the AI controller, but some interventions are need on the Player Controller. Create a new C++ Player Controller class that inherits from the base PlayerController. We have now to implement the IGenericTeamAgentInterface for this controller too.
#include "CoreMinimal.h"
#include "GameFramework/PlayerController.h"
#include "GenericTeamAgentInterface.h"
#include "APlayerControllerTeam.generated.h"

class APlayerControllerTeam;

UCLASS()
class TUTORIAL_API APlayerControllerTeam : public APlayerController, public IGenericTeamAgentInterface
{
  GENERATED_BODY()

public:
  APlayerControllerTeam();

private:
  // Implement The Generic Team Interface
  FGenericTeamId TeamId;
  FGenericTeamId GetGenericTeamId() const;
};
And its implementation is very easy:
#include "APlayerControllerTeam.h"

APlayerControllerTeam::APlayerControllerTeam()
{
  PrimaryActorTick.bCanEverTick = true;
  TeamId = FGenericTeamId(10);
}

FGenericTeamId APlayerControllerTeam::GetGenericTeamId() const
{
  return TeamId;
}
You should now create your blueprints inheriting from these new classes, and the detect by affiliation will work as expected.
You can check this Gist for the AI Controller code
USING THE AI PERCEPTION SYSTEM
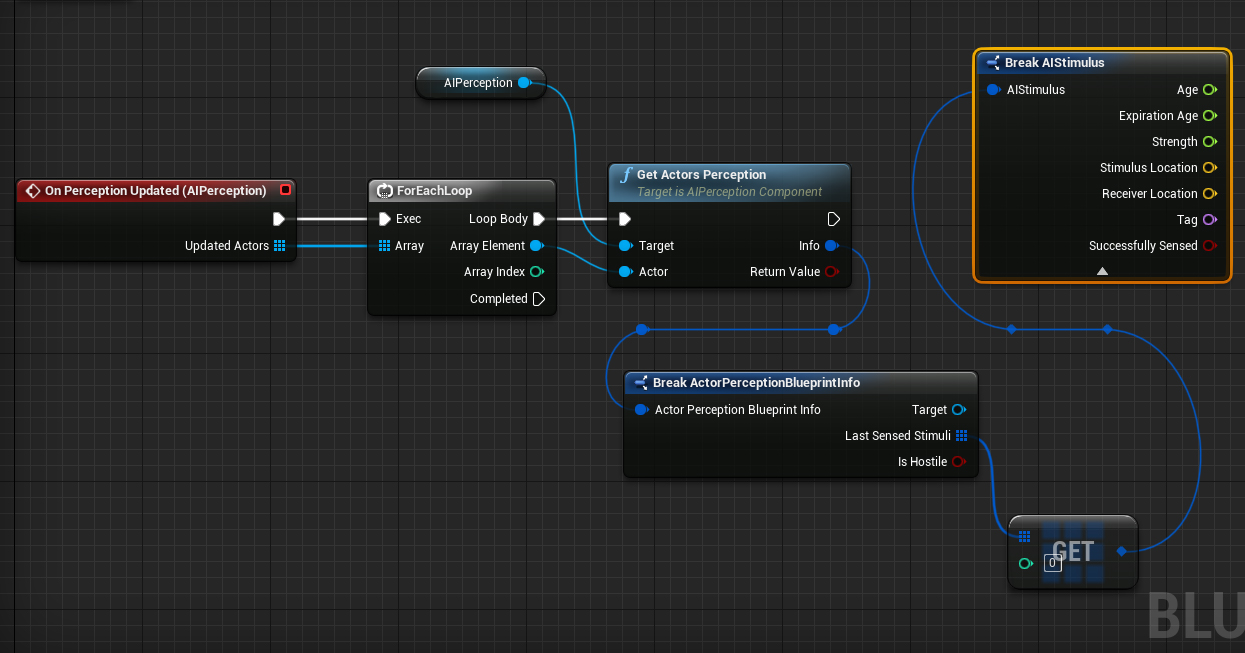
The easiest way to go through Blueprints is to open the SightAIController blueprint (or a blueprint that inherits from this class, if you have implemented it in C++), select the AIPerception components and use one of the available events for this component. As example you could use the OnPerceptionUpdate event to get all the updates of the AI perception. You could then access the perception info through something similar to this BP (please not that we are using Get(0) because we are taking for granted the fact that only one sense, the sight, could be triggered for this example).
Another common way to use the AI Perception system in conjunction with a Behaviour Tree. In this case you could fill a blackboard item with the enemy spotted and update another blackboard item with its position.
I hope that this article will be helpful to you. Please feel free to provide your hints through the comment box below and add any other useful info for the other users (I will updated the article in case you guys spot anything wrong or that deserves more details).
Ciao!

Yari D'areglia
https://www.thinkandbuild.itSenior iOS developer @ Neato Robotics by day, game developer and wannabe artist @ Black Robot Games by night.